GIGABYTE P67A-UD3 Motherboard Review

/ บทความโดย: Venom-Crusher , 20/01/2011 01:12, 6,306 views / view in EnglishEN
«»
Share

p67aud3 GIGABYTE P67A UD3 Motherboard Review

สวัสดีครับ สำหรับในวันนี้ผมก็มีบทความมาเธอร์บอร์ดสำหรับซีพียู Generation 2 Intel Core Processor ลำดับที่ 12 ของเว็บไซต์เรามานำเสนอ ซึ่งในคราวนี้ก็จะเป็นมาเธอร์บอร์ดจากทาง GIGABYTE กันอีกครั้งนะครับ โดยมาเธอร์บอร์ดรุ่นนี้จะมากันในชื่อรุ่น GIGABYTE P67A-UD3 ก่อนอื่นเราไปชมสเป็คต่างๆของตัวมาเธอร์บอร์ดตัวนี้กันก่อนนะครับ

.

Overview

Introduction
GIGABYTE P67A-UD3 motherboards is designed and engineered to deliver exceptional performance and clarity for your computing needs. Powered by the Intel® P67 chipset with support for 2nd Generation Intel® Core™ processors, GIGABYTE P67A-UD3 enjoy uniquely developed technologies such as Smart 6 , Cloud OC, Hockey OC technology and Ultra Durable 3 Classic design just to name a few, that ensure a reliable and enjoyable computing experience.
1793 GIGABYTE P67A UD3 Motherboard Review
New 100% Hardware VRD 12 Compliant CPU Power Design
1831 GIGABYTE P67A UD3 Motherboard Review

GIGABYTE 6 series motherboards incorporate an Intel® approved Intersil PWM controller that is VRD 12 (Voltage Regulator Down) compliant. This means that it offers new features that include SerialVID (SVID) which transfers power management information between the processor and voltage regulator controller, allowing more robust and efficient signaling control between the CPU and PWM controller – hence, delivering a more energy efficient platform.

1795 GIGABYTE P67A UD3 Motherboard Review
DualBIOS™ - Patented Dual Hardware BIOS Protection
1829 GIGABYTE P67A UD3 Motherboard Review
GIGABYTE DualBIOS™ is a patented technology that automatically recovers BIOS data when the main BIOS has crashed or failed. Featuring 2 physical BIOS ROMs integrated onboard, GIGABYTE DualBIOS™ allows quick and seamless recovery from BIOS damage or failure due to viruses or improper BIOS updating. In addition, GIGABYTE DualBIOS™ now supports booting from 3TB+ (terabytes) hard drives without the need for partitioning, and enables more data storage on a single hard drive.
1820 GIGABYTE P67A UD3 Motherboard Review
Ultra Durable 3 Classic
GIGABYTE Ultra Durable 3 Classic design, featuring 2 ounces of copper for both the Power and Ground layers which dramatically lowers system temperature by delivering a more efficient spreading of heat from critical areas of the motherboard such as the CPU power zone throughout the entire PCB. A 2oz Copper layer design also provides improved signal quality and lower EMI (Electromagnetic Interference), providing better system stability and allowing for greater margins for overclocking.
1668 GIGABYTE P67A UD3 Motherboard Review
On/Off Charge Technology
GIGABYTE On/Off Charge technology allows you to charge your iPhone, iPad and iPod Touch regardless of whether your PC is on, in standby mode or even off. A derivative of GIGABYTE’s highly acclaimed 3x USB Power feature, On/Off Charge enables devices to draw more current from GIGABYTE motherboard USB ports than standard USB ports allow, so that charging from your PC can be as fast as with a charger…more
Note: Due to certain mobile phone limitations, users may need to connect the mobile phone to their PC before the PC enters S4/S5 mode to enable a quick charge from non On/Off Charge USB ports. Charging results may vary by model.
1740 GIGABYTE P67A UD3 Motherboard Review
1798 GIGABYTE P67A UD3 Motherboard Review
SuperSpeed USB 3.0
GIGABYTE Ultra Durable™ 3 motherboards boast SuperSpeed USB 3.0 technology made possible through an additional onboard host controller. With superfast transfer rates of up to 5 Gbps, users are able to experience a theoretical 10x improvement over USB 2.0. Additionally, backwards compatibility with USB 2.0 assures users of long term use of their legacy USB 2.0 devices.
1799 GIGABYTE P67A UD3 Motherboard Review

Turbo USB3.0 – Boosts Performance by Up To 10%
1828 GIGABYTE P67A UD3 Motherboard Review
When GIGABYTE’s Turbo USB3.0 feature is enabled, it provides the fastest possible USB3.0 performance by allocating PCIe lanes to directly connect the CPU and USB 3.0 controller chip. This provides approximately 10% better performance than when it is disabled and USB 3.0 traffic is directed through the chipset.
Note: Turbo USB 3.0 utilizes 8 PCIe VGA lanes, so it is only possible to enable it with a single graphics card running at PCIe x8 on P67 chipset motherboards, or while using Intel® HD Graphics from the CPU (i.e. no VGA card) on H67 chipset motherboards. It is an option for high bandwidth users.

1800 GIGABYTE P67A UD3 Motherboard Review
SATA 6 Gbps
GIGABYTE Ultra Durable™ 3 motherboards are High-Speed SATA Revision 3.0 compatible, delivering superfast 6Gbps link speeds for twice the data transfer rates of SATA Revision 2.0 (3 Gbps). When used in RAID 0 (Stripe) mode, they offer even faster data transfer rates of up to a theoretical 4x the speed of current SATA interfaces.
1801 GIGABYTE P67A UD3 Motherboard Review
1803 GIGABYTE P67A UD3 Motherboard Review
3x USB Power Boost
GIGABYTE motherboards feature a 3x USB power boost, delivering greater compatibility and extra power for USB devices. GIGABYTE’s unique USB power design is also able to efficiently regulate output over the full voltage range, which greatly enhances USB device compatibility. In addition, dedicated lower resistance fuses ensure lower voltage drops, and provide more stable and plentiful power delivery.
1802 GIGABYTE P67A UD3 Motherboard Review
1811 GIGABYTE P67A UD3 Motherboard Review
Turbo XHD- Full Automatic RAID 0
GIGABYTE Turbo XHD provides a quick and easy way to boost your hard drive performance by automatically detecting 2 new SATA3 HDDs and enabling users to effortlessly set up a RAID 0 configuration via an easy to use utility. RAID 0 boosts HDD performance by up to 4X.
Turbo XHD function only enabled for the SATA controllers integrated in the Intel P67/H67 Chipset.
56 GIGABYTE P67A UD3 Motherboard Review
Dynamic Energy Saver™ 2
GIGABYTE Dynamic Energy Saver™ 2 incorporates a host of intelligent features that, at the click of a button, utilize a proprietary hardware and software design to considerably enhance PC system energy efficiency, reduce power consumption and deliver optimized auto-phase-switching for the CPU, Memory, Chipset, VGA, HDD, and fans.
1819 GIGABYTE P67A UD3 Motherboard Review
Multi-display support with 2 way CrossFireX
Flexible graphics capabilities - Up to 2 VGA cards are supported for 2 way CrossFireX™, delivering the ultimate in graphics performance for gaming enthusiasts who demand the highest frame rates without compromising on resolution.
1812 GIGABYTE P67A UD3 Motherboard Review
Smart 6 – Smarter PC system Management
1807 GIGABYTE P67A UD3 Motherboard Review

88 GIGABYTE P67A UD3 Motherboard Review Smart QuickBoot
Speeds up booting times.
91 GIGABYTE P67A UD3 Motherboard Review Smart DualBIOS
Smart personal reminder of PC passwords.
89 GIGABYTE P67A UD3 Motherboard Review Smart QuickBoost
One-click Overclocking
92 GIGABYTE P67A UD3 Motherboard Review Smart Recorder
Your PC’s Watch Dog
90 GIGABYTE P67A UD3 Motherboard Review Smart Recovery 2
Allows you to go back in time on your PC and retrieve lost files
93 GIGABYTE P67A UD3 Motherboard Review Smart TimeLock
Time Controller for your PC.
1720 GIGABYTE P67A UD3 Motherboard Review
Cloud OC

GIGABYTE Cloud OC is a free overclocking application that facilitates PC overclocking through any web browsing capable device such as a smart phone, iPad, iPhone, Netbooks or notebook PC. Being browser based, it connects via wireless Internet, Bluetooth or through an Ethernet cable, and its many functions are categorized into three tabs: Tuner, System Info and Control…more
1741 GIGABYTE P67A UD3 Motherboard Review

1721 GIGABYTE P67A UD3 Motherboard Review
Hotkey OC
GIGABYTE Hotkey OC allows users to create and save various profiles that can be adopted for different benchmarks. Hotkey OC then allows users to jump between these profiles on the fly so that the best profile for each segment within the benchmark can be used to optimize scores and boost overall performance. For example, when running 3DMark 06, the 1st profile might be optimized for graphics, and can be used for the first two graphics tests, then, the next two tests can utilize the 2nd profile which might be optimized for CPU tests, and one could jump back to the 1st profile again for the final two graphics (shader) tests…more
1742 GIGABYTE P67A UD3 Motherboard Review
51 GIGABYTE P67A UD3 Motherboard Review
AutoGreen- Greening your PC via Bluetooth cellphone
AutoGreen technology can automatically save power by simply putting your PC in a state of sleep when your Bluetooth® cell phone is out of range of your computer.
Note: GIGABYTE motherboards do not include a Bluetooth® receiver; the addition of a 3rd party Bluetooth receiver is required.
1817 GIGABYTE P67A UD3 Motherboard Review
Hardware OverVoltage Control IC - Enabling Extreme Overclocking
GIGABYTE Hardware Overvoltage Control ICs feature more voltage control options than before for the CPU North Bridge and memory. The overvoltage controllers also provide hardware linear real-time voltage control, which means there is no delay compared to the GPIO controller in past implementations.
60 GIGABYTE P67A UD3 Motherboard Review
ErP Lot 6 support
The ErP (also known as Energy-Related Products Directive) is part of the European Union’s environmental regulations policy. It is based on concern for the environmental as the proliferation of electronic devices continues, and how to improve energy efficiency for a better and greener life. GIGABYTE supports ErP and produces motherboards that help you effectively improve system efficiency.

.

Specifications

CPU
  1. Support for Intel® Core™ i7 processors/Intel® Core™ i5 processors/ Intel® Core™ i3 processors/Intel® Pentium® processors/Intel® Celeron® processors in the LGA1155 package (Go to GIGABYTE’s website for the latest CPU support list.)
  2. L3 cache varies with CPU
Chipset
  1. Intel® P67 Express Chipset
Memory
  1. 4 x 1.5V DDR3 DIMM sockets supporting up to 32 GB of system memory
    * Due to Windows 32-bit operating system limitation, when more than 4 GB of physical memory is installed, the actual memory size displayed will be less than 4 GB.
  2. Dual channel memory architecture
  3. Support for DDR3 2133/1866/1600/1333/1066 MHz memory modules
  4. Support for non-ECC memory modules
  5. Support for Extreme Memory Profile (XMP) memory modules

(Go to GIGABYTE’s website for the latest supported memory speeds and memory modules.)

Audio
  1. Realtek ALC892 codec
  2. High Definition Audio
  3. 2/4/5.1/7.1-channel
  4. Support for S/PDIF Out
LAN
  1. 1 x Realtek RTL8111E chip (10/100/1000 Mbit)
Expansion Slots
  1. 1 x PCI Express x16 slot, running at x16 (PCIEX16)
    * For optimum performance, if only one PCI Express graphics card is to be installed, be sure to install it in the PCIEX16 slot.
  2. 1 x PCI Express x16 slot, running at x4 (PCIEX4)
    * When the PCIEX1_2 or PCIEX1_3 slot is populated with an expansion card, the PCIEX4 slot will operate at up to x1 mode.
  3. 3 x PCI Express x1 slots
    (All PCI Express slots conform to PCI Express 2.0 standard.)
  4. 2 x PCI slots
Multi-Graphics Technology
  1. Support for ATI CrossFireX™
    * The PCIEX16 slot operates at up to x4 mode when ATI CrossFireX™ is enabled.
Storage Interface Chipset:

  1. 2 x SATA 6Gb/s connectors (SATA3_0, SATA3_1) supporting up to 2 SATA 6Gb/s devices
  2. 4 x SATA 3Gb/s connectors (SATA2_2, SATA2_3, SATA2_4, SATA2_5) supporting up to 4 SATA 3Gb/s devices
  3. Support for SATA RAID 0, RAID 1, RAID 5, and RAID 10
    * When a RAID set is built across the SATA 6Gb/s and SATA 3Gb/s channels, the system performance of the RAID set may vary depending on the devices being connected.
USB Chipset:

  1. Up to 12 USB 2.0/1.1 ports (8 on the back panel, 4 via the USB brackets connected to the internal USB headers)

Renesas D720200 chip:

  1. Up to 2 USB 3.0/2.0 ports on the back panel.
Internal I/O Connectors
  1. 1 x 24-pin ATX main power connector
  2. 1 x 8-pin ATX 12V power connector
  3. 2 x SATA 6Gb/s connectors
  4. 4 x SATA 3Gb/s connectors
  5. 1 x CPU fan header
  6. 2 x system fan headers
  7. 1 x power fan header
  8. 1 x front panel header
  9. 1 x front panel audio header
  10. 1 x S/PDIF Out header
  11. 2 x USB 2.0/1.1 headers
  12. 1 x serial port header
  13. 1 x clearing CMOS jumper
Back Panel Connectors
  1. 1 x PS/2 keyboard/mouse port
  2. 1 x coaxial S/PDIF Out connector
  3. 1 x optical S/PDIF Out connector
  4. 8 x USB 2.0/1.1 ports
  5. 2 x USB 3.0/2.0 ports
  6. 1 x RJ-45 port
  7. 6 x audio jacks (Center/Subwoofer Speaker Out/Rear Speaker Out/ Side Speaker Out/Line In/Line Out/Microphone)
I/O Controller
  1. iTE IT8728 chip
H/W Monitoring
  1. System voltage detection
  2. CPU/System temperature detection
  3. CPU/System/Power fan speed detection
  4. CPU overheating warning
  5. CPU/System/Power fan fail warning
  6. CPU/System fan speed control
    *Whether the CPU/system fan speed control function is supported will depend on the CPU/system cooler you install.
BIOS
  1. 2 x 32 Mbit flash
  2. Use of licensed AWARD BIOS
  3. Support for DualBIOS™
  4. PnP 1.0a, DMI 2.0, SM BIOS 2.4, ACPI 1.0b
Unique Features
  1. Support for @BIOS
  2. Support for Q-Flash
  3. Support for Xpress BIOS Rescue
  4. Support for Download Center
  5. Support for Xpress Install
  6. Support for Xpress Recovery2
  7. Support for EasyTune
    * Available functions in EasyTune may differ by motherboard model.
  8. Support for Dynamic Energy Saver™ 2
  9. Support for Smart 6™
  10. Support for Auto Green
  11. Support for eXtreme Hard Drive (X.H.D)
  12. Support for ON/OFF Charge
  13. Support for Cloud OC
  14. Support for Q-Share
Bundle Software
  1. Norton Internet Security (OEM version)
Operating System
  1. Support for Microsoft® Windows® 7/Vista/XP
Form Factor
  1. ATX Form Factor; 30.5cm x 21.5cm
Remark
  1. Due to different Linux support condition provided by chipset vendors, please download Linux driver from chipset vendors’ website or 3rd party website.
  2. Most hardware/software vendors no longer offer support for Win9X/ME/2000/XP SP1/SP2. If drivers are available from the vendors, we will update them on the GIGABYTE website.

* The entire materials provided herein are for reference only. GIGABYTE reserves the right to modify or revise the content at anytime without prior notice.
* Advertised performance is based on maximum theoretical interface values from respective Chipset vendors or organization who defined the interface specification. Actual performance may vary by system configuration.
* All trademarks and logos are the properties of their respective holders.
* Due to standard PC architecture, a certain amount of memory is reserved for system usage and therefore the actual memory size is less than the stated amount.

.

More informations >>Click<<

เมื่อชมสเป็คกันครบถ้วนแล้ว ก็ไปดูหน้าตามาเธอร์บอร์ดตัวนี้ พร้อมๆกันที่หน้าถัดๆไปเลยดีกว่าครับ

————————————————–

Package & Bundle

dsc 0001 GIGABYTE P67A UD3 Motherboard Review

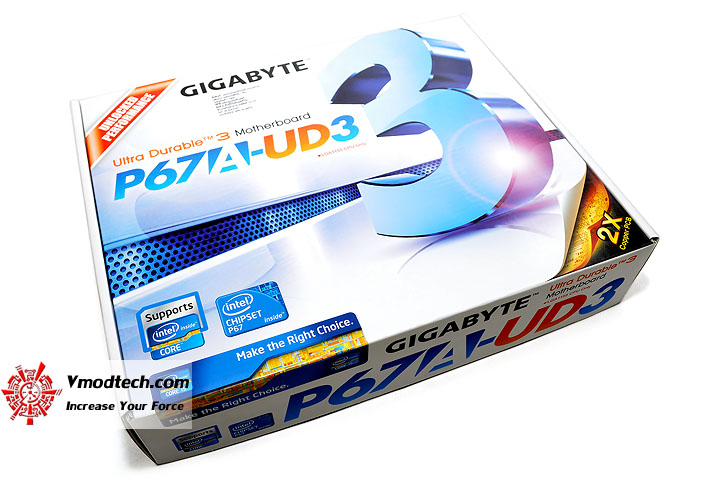
หน้าตาตัวกล่องด้านหน้าครับ กลับสู่สไตล์เดิมของทาง GIGABYTE กันอีกครั้งนะครับ
dsc 0002 GIGABYTE P67A UD3 Motherboard Review

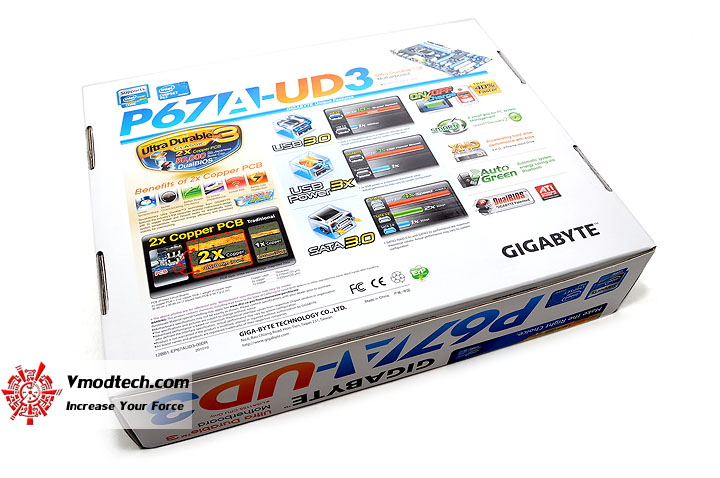
ด้านหลังกล่องก็บรรยายสเป็คต่างๆของตัวบอร์ดกันเพียบเช่นเคย
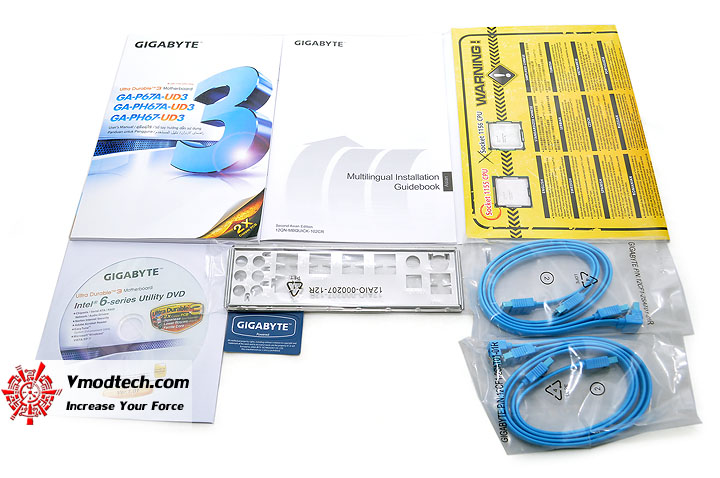
dsc 0003 GIGABYTE P67A UD3 Motherboard Review

อุปกรณ์ต่างๆที่ Bundle มาในกล่องครับ

Motherboard Appearance
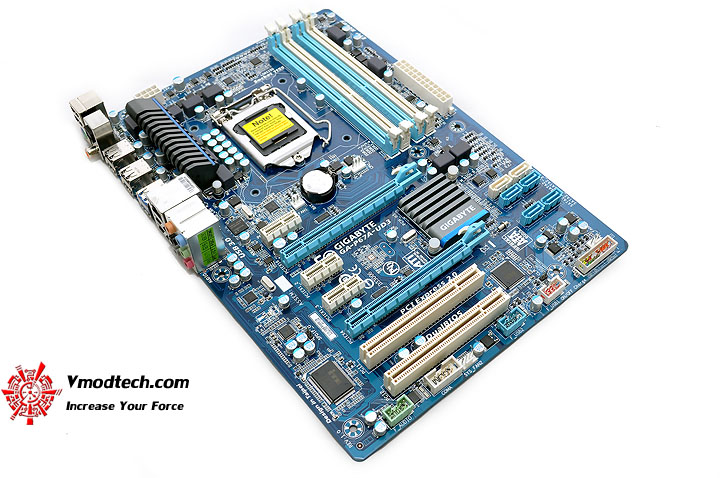
dsc 0004 GIGABYTE P67A UD3 Motherboard Review

หน้าตาของตัวมาเธอร์บอร์ด โทนสีฟ้าขาวครีม ก็ถูกนำมาใช้กันอีกครั้งนะครับ
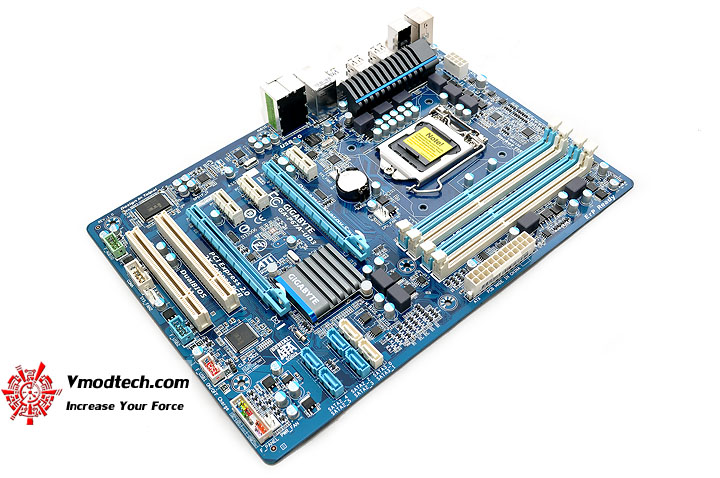
dsc 0005 GIGABYTE P67A UD3 Motherboard Review

หมุนให้ชมกันอีกมุมมองครับ

dsc 0006 GIGABYTE P67A UD3 Motherboard Review

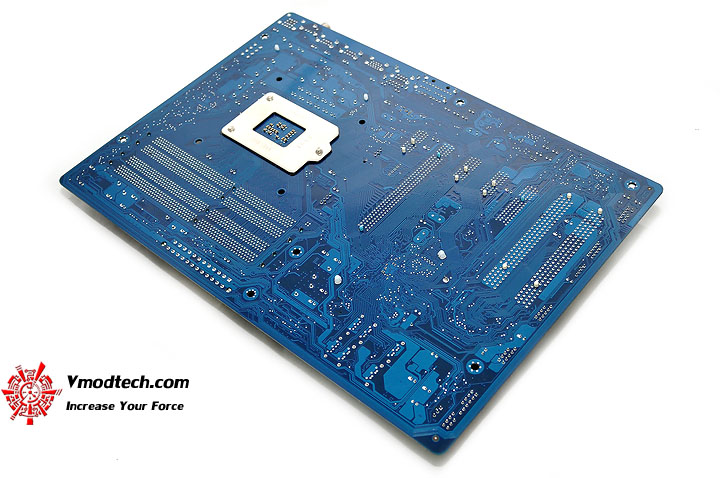
ด้านหลังบอร์ดก็ PCB สีฟ้าน้ำทะเลกันไปครับ
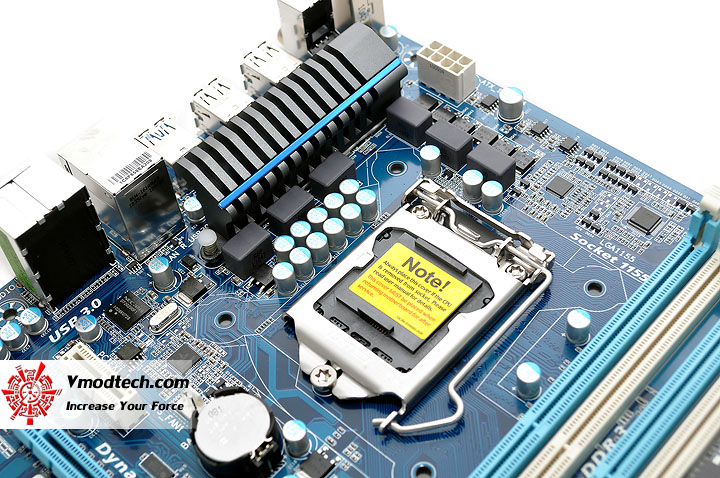
dsc 0007 GIGABYTE P67A UD3 Motherboard Review

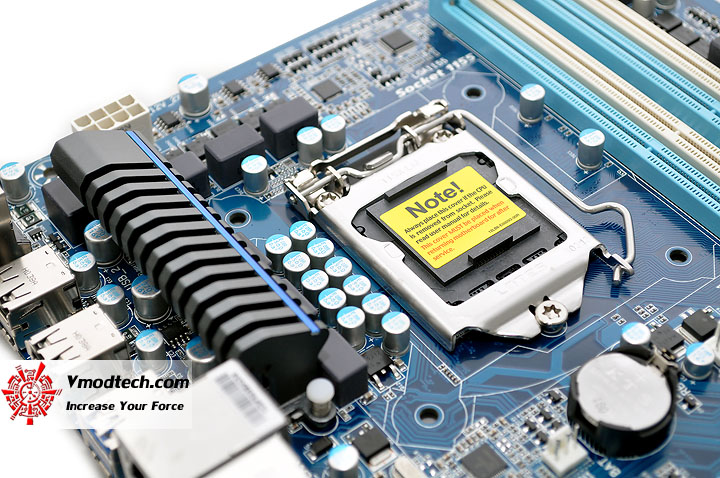
หน้าตาบริเวณรอบๆ CPU Socket จะมากันแบบประหยัดต้นทุน พร้อมกับภาคจ่ายไฟ 6เฟส และ Lotes Socket ครับ
dsc 0008 GIGABYTE P67A UD3 Motherboard Review

เนื่องจากบอร์ดตัวนี้เป็นไซด์ขนาด ATX แบบหน้าแคบ จึงทำให้ตัวสล็อตแรมและซ๊อคเกตซีพียูอยู่ชิดกันมาก ถ้าใครสนใจซื้อมาเธอร์บอร์ดรุ่นนี้มาใช้ จึงควรตรวจสอบขนาดของซิงค์ระบายความร้อนซีพียูและขนาดความสูงของซิงค์แรมที่จะใช้ ก่อนตัดสินใจลงทุนด้วยนะครับ
————————————————–

dsc 0009 GIGABYTE P67A UD3 Motherboard Review

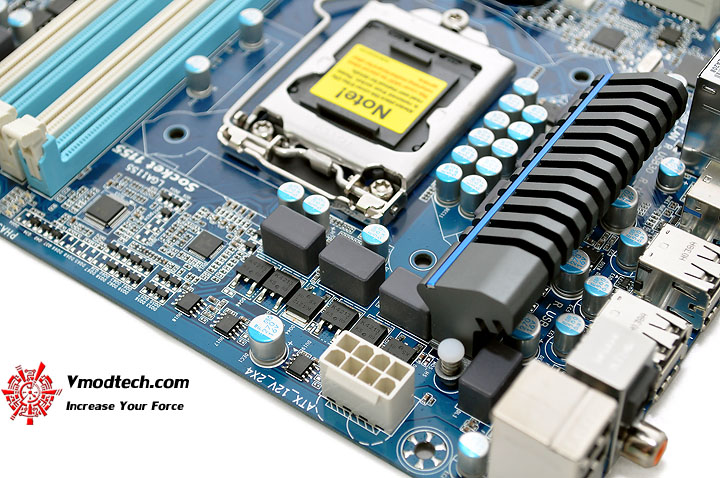
ขั้วไฟเลี้ยง CPU 12V. แบบ 8พิน ที่นิยมใช้กับมาเธอร์บอร์ดรุ่นใหญ่ ก็ถูกนำมาใช้ในมาเธอร์บอร์ดรุ่นนี้ด้วยครับ
dsc 0010 GIGABYTE P67A UD3 Motherboard Review

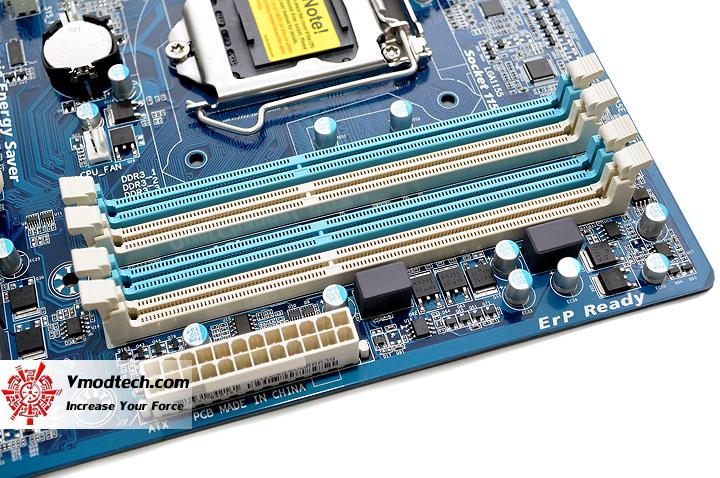
สล็อตแรมแบบ 4แถว Dual Channel พร้อมภาคจ่ายไฟแรมแบบ 2เฟสครับ
dsc 0011 GIGABYTE P67A UD3 Motherboard Review

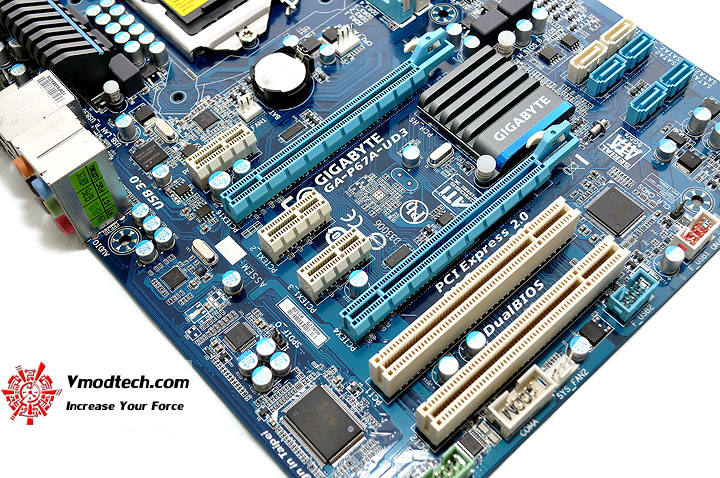
PCI-e X16 2ช่อง โดยที่ช่อง 1 จะทำงานที่ X16 ตลอดเวลาครับ ส่วนช่องที่ 2 จะทำงานที่ X4 ตลอดเวลาครับ ซึ่งทั้งสองช่องนี้จะทำงานร่วมกันได้ในโหมด CrossfireX ที่ X16+X4 นะครับ ตามด้วย PCI-e X1 2ช่อง และ PCI 32bit อีก 2ช่องครับ ครบถ้วนทุกการใช้งานครับ
dsc 0012 GIGABYTE P67A UD3 Motherboard Review

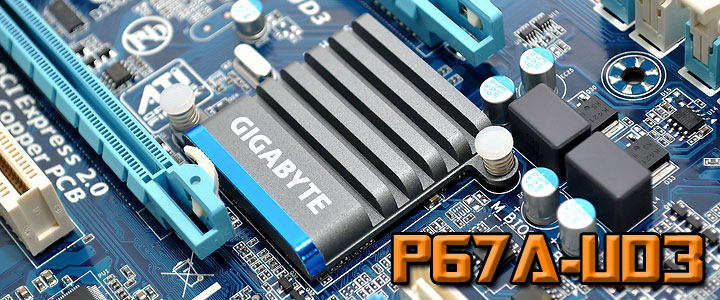
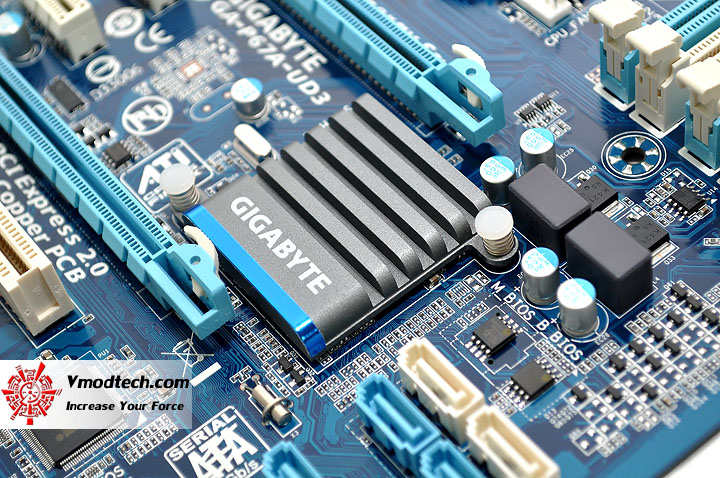
บริเวณซิงค์ของชิป Intel P67 ขนาดเล็กกระทัดรัดครับ
dsc 0013 GIGABYTE P67A UD3 Motherboard Review

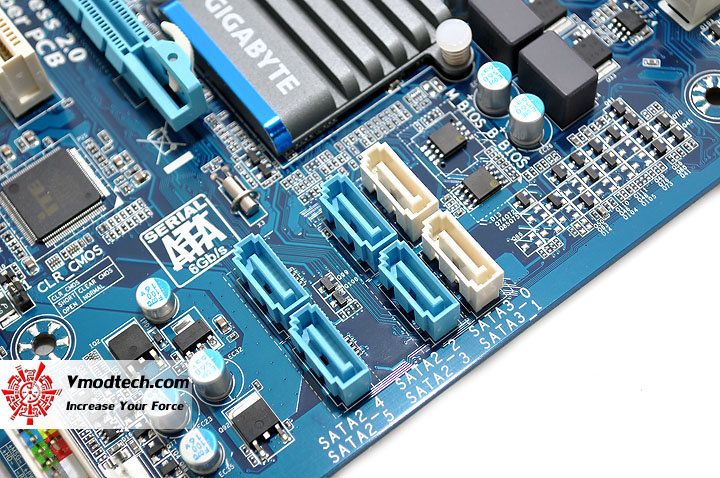
SATA2 สีฟ้า 4Ports , SATA3 สีครีม 2Ports ที่มาจากชิป Intel P67 ซึ่งการจัดวางแบบนี้จะมีปัญหาในการเสียบสาย SATA อยู่บ้างพอสมควรนะครับ กล่าวคือถ้าใส่การ์ดจอที่ติดชุดระบายความร้อนชนิดพิเศษที่ติดตั้งเพิ่มเอง ซึ่งร้อยละ90 เมื่อติดตั้งซิงค์แล้วความหนารวมของตัวการ์ดจะกินพื้นที่ 3สล็อต ก็จะไปบังช่อง SATA3 สีครีมในทันทีนะครับ และช่อง SATA2 สีฟ้าช่องที่ 4-5 เมื่อติดตั้งการ์ดจอในช่อง PCI-e X16 ช่องที่ 2 ตัวการ์ดก็จะไปบัง 2ช่องที่ว่าในทันทีเช่นกันครับ
dsc 0014 GIGABYTE P67A UD3 Motherboard Review

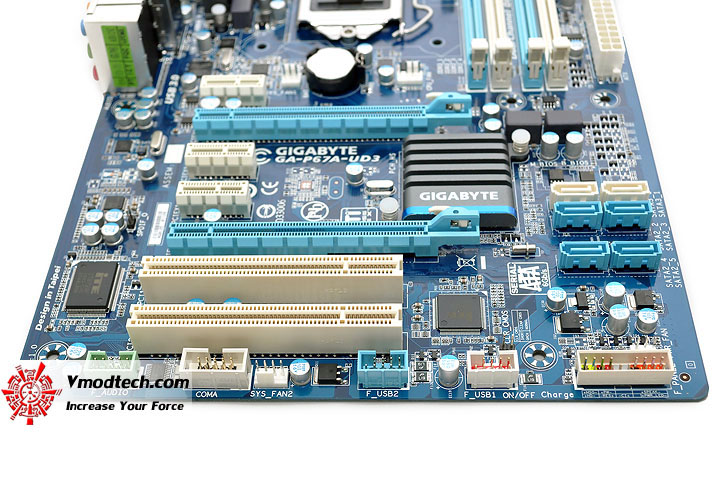
บริเวณที่เสียบ Front Panel ต่างๆครับ

dsc 0015 GIGABYTE P67A UD3 Motherboard Review

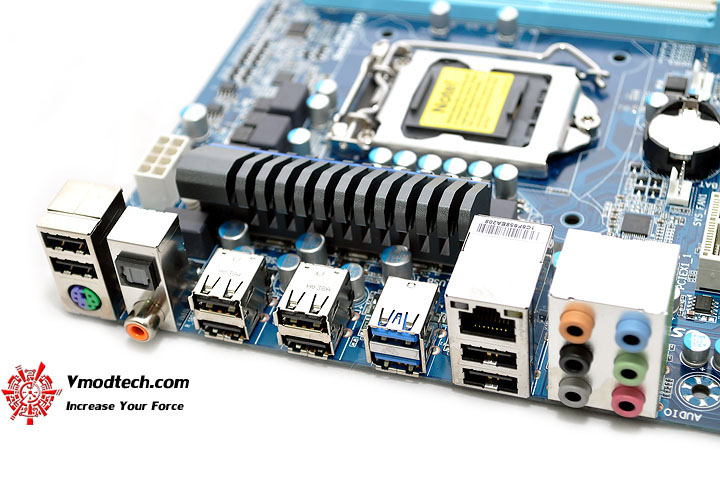
Back Panel ด้านหลังมากันครบๆทุกการเชื่อมต่อ พร้อมช่อง USB 3.0 สีฟ้าอีก 2ช่องทางครับ

————————————————–

Test Setup

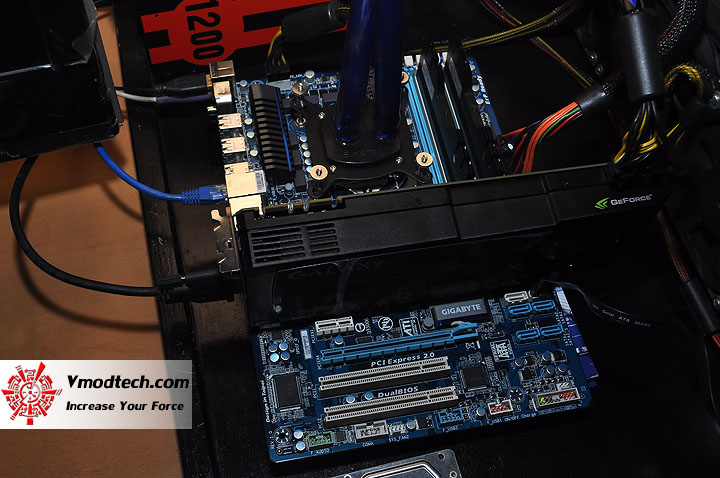
dsc 00011 GIGABYTE P67A UD3 Motherboard Review

ทดสอบกันด้วยระบบระบายความร้อนด้วยน้ำธรรมดา ในห้องปรับอากาศที่มีอุณหภูมิประมาณ 25องศาเซลเซียสกันเช่นเดิมครับ

.SYSTEMS
.CPU ..Intel Core i7 2600K
.Motherboard ..GIGABYTE P67A-UD3
.Memory ..G.Skill Trident PC12800 CL8D-4GBTD 2GB*2 Dual Channel
.Graphic Card ..Galaxy GTX 570 @ 940/1,880/4,600MHz
.Harddisk ..WD1002FAEX 1TB SATA3
.CPU Cooler ..Water Cooling @ Ambient 25C
.Power Supply ..Antec TPQ-1200 OC Version 1200W
.Operation System ..Windows 7 Enterprise 32-bit

เพื่อไม่ให้เป็นการเสียเวลา เริ่มทำการทดสอบกันในแบบโอเวอร์คล็อคล้วนๆ ตามแนวถนัดของ Vmodtech.com กันเลยดีกว่าครับ

CPU-Z Validation

va GIGABYTE P67A UD3 Motherboard Review

(Click ScreenShot to Validation Link)

CPU-Z Detail

c1 GIGABYTE P67A UD3 Motherboard Review

c2 GIGABYTE P67A UD3 Motherboard Review

c3 GIGABYTE P67A UD3 Motherboard Review

c4 GIGABYTE P67A UD3 Motherboard Review

c5 GIGABYTE P67A UD3 Motherboard Review

c6 GIGABYTE P67A UD3 Motherboard Review

GPU-Z Detail

c7 GIGABYTE P67A UD3 Motherboard Review

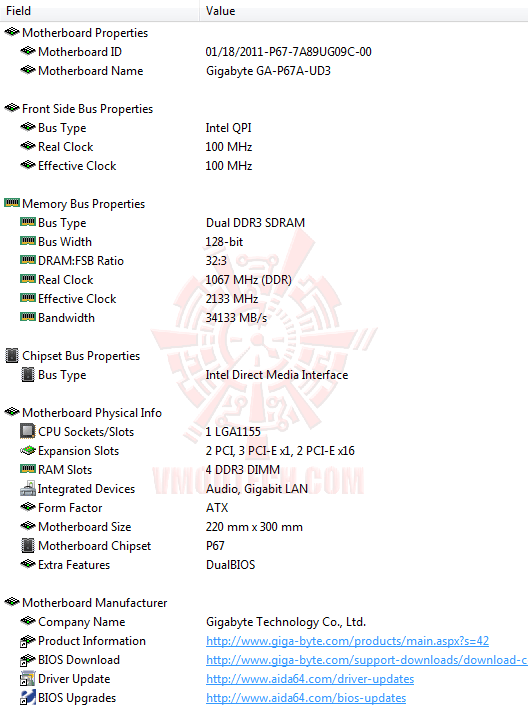
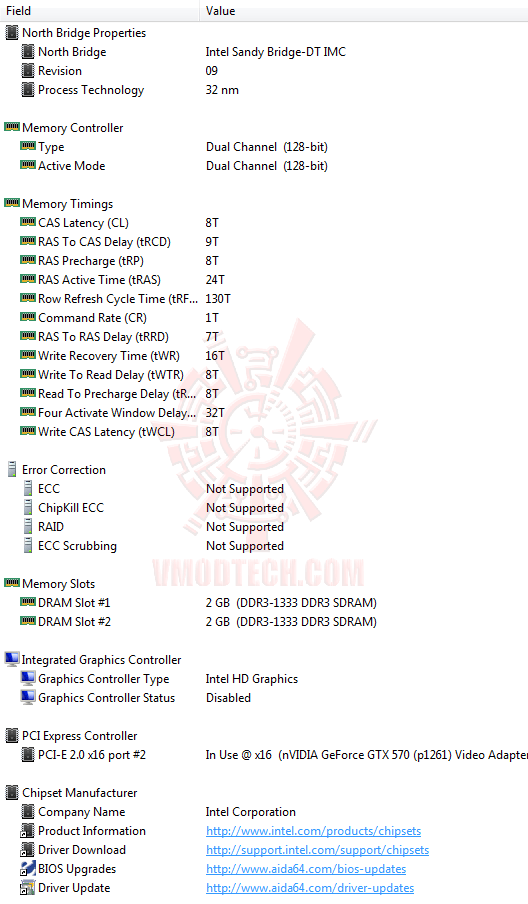
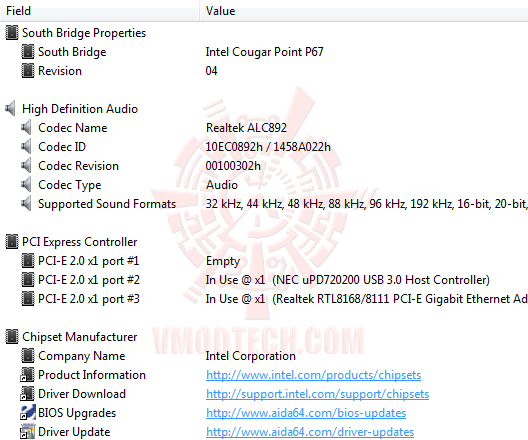
AIDA64 Detail

ed1 GIGABYTE P67A UD3 Motherboard Review

ed2 GIGABYTE P67A UD3 Motherboard Review

ed3 GIGABYTE P67A UD3 Motherboard Review

ed4 GIGABYTE P67A UD3 Motherboard Review

ed5 GIGABYTE P67A UD3 Motherboard Review

ed6 GIGABYTE P67A UD3 Motherboard Review

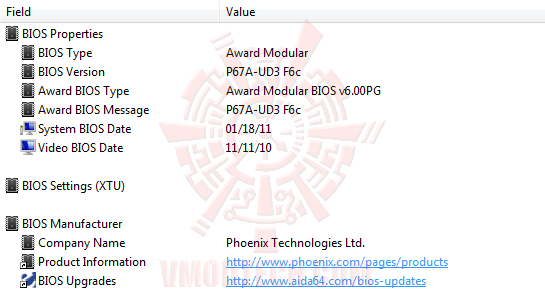
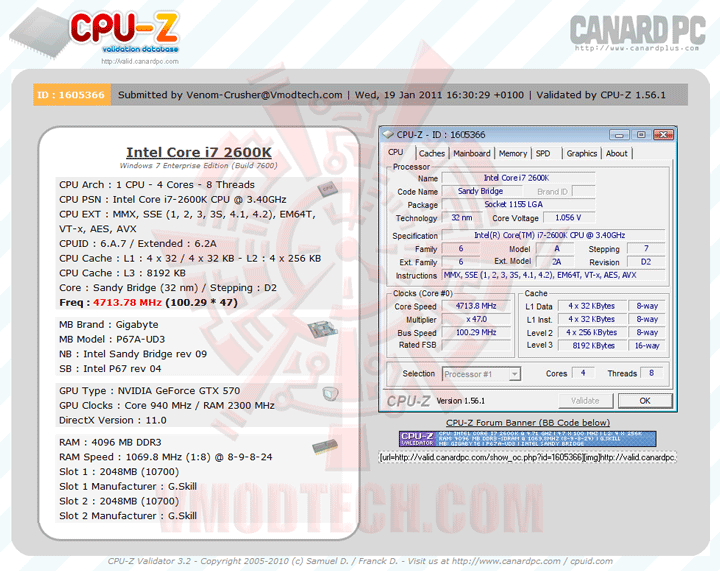
ทั้งๆที่ผมใช้ BIOS ล่าสุดที่มีฟังก์ชัน Internal CPU PLL Overvoltage แล้ว แถมยังระบายความร้อนให้กับซีพียูด้วยระบบระบายความร้อนด้วยน้ำ แต่ทำไมผมถึงยังเทสต์ที่ความเร็วแค่ 4.7GHz เพียงเท่านั้น ก็ขออธิบายว่า บอร์ดตัวที่ผมทดสอบนี้ มีปัญหาใหญ่สำหรับการ Overclock ก็คือ ไม่สามารถเพิ่มไฟ VCore ได้ พอเพิ่มเมื่อไหร่ แม้ว่าค่าต่างๆใน BIOS ที่เซตไว้จะเป็นค่า Default ทั้งหมด เมื่อเซฟเสร็จระบบก็จะบูตติดๆดับๆอยู่สักพัก ถ้าไม่รีบปิดแล้วเคลียร์ CMOS ระบบ Dual BIOS ก็จะทำงาน Recovery BIOS ตัว Backup มาแฟลชทับตัว Main ในทันที ซึ่งผมก็ได้ลองแฟลชไบออสไล่มาตัวแต่ตัวที่ติดบอร์ด F3 F4 F5 F6A จนถึงตัวล่าสุดที่ใช้ทำบทความนี้ก็คือ F6C ยังไงก็ยังเพิ่มไฟ VCore ไม่ได้อยู่ดี เพิ่มเมื่อไหร่ดับตลอด ไม่ว่าจะเพิ่มไฟแบบเลือกค่าไฟโดยตรงหรือเพิ่มแบบ Offset บวกค่าไฟเพิ่มขึ้นไปจากค่าเดิม ผมก็เลยจำต้องเล่นที่ค่าไฟ VCore Default ตลอดการทดสอบในครั้งนี้นะครับ แล้วก็ไปลุยทดสอบที่ความเร็ว 4,714MHz BClk 100.3MHz DDR3-2140 7-10-7-24-1T ไฟ VCore เดิมๆกันเลยครับ

————————————————–

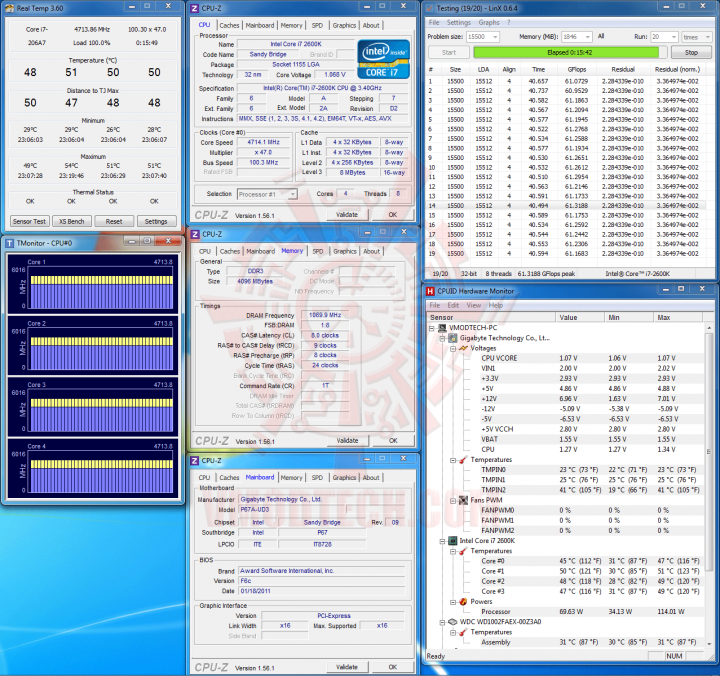
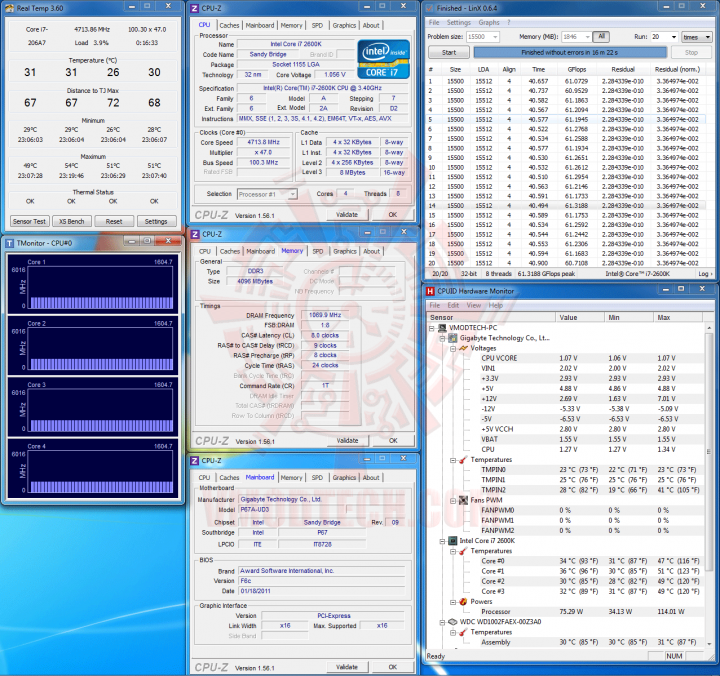
LinX 0.6.4 Problem size 15500 Memory used 1846MB (All of 32-bit OS) 20Loops

4714 1 720x676 GIGABYTE P67A UD3 Motherboard Review

(Click ScreenShot to Enlarge)

4714 2 720x676 GIGABYTE P67A UD3 Motherboard Review

(Click ScreenShot to Enlarge)

จัดกันไป 20Loops กันตามมาตรฐานนะครับ ผ่านสบายครับสำหรับ LinX ตัวคูณที่ 47 ล็อคกันสนิท ไม่มีแอบร่วงตอน FullLoad หนักๆแต่อย่างใด ไฟ VCore FullLoad สูงสุดที่ 1.34V. (อ่านค่าจากCPUID Hardware Monitor) จะร้อนสูงสุดที่ 54องศาเซลเซียสใน Real Temp นะครับ

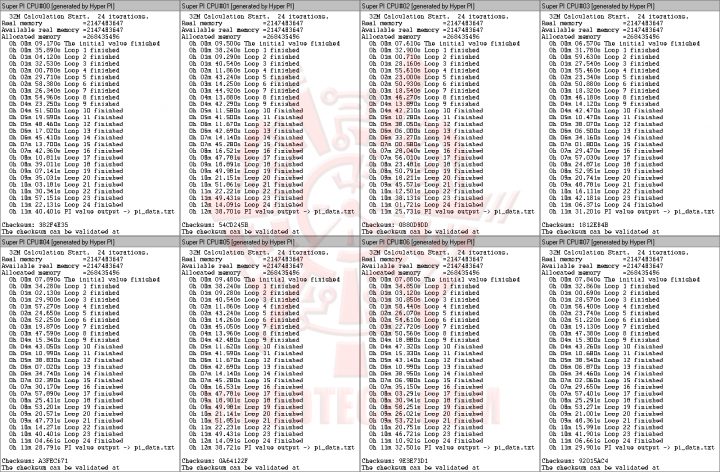
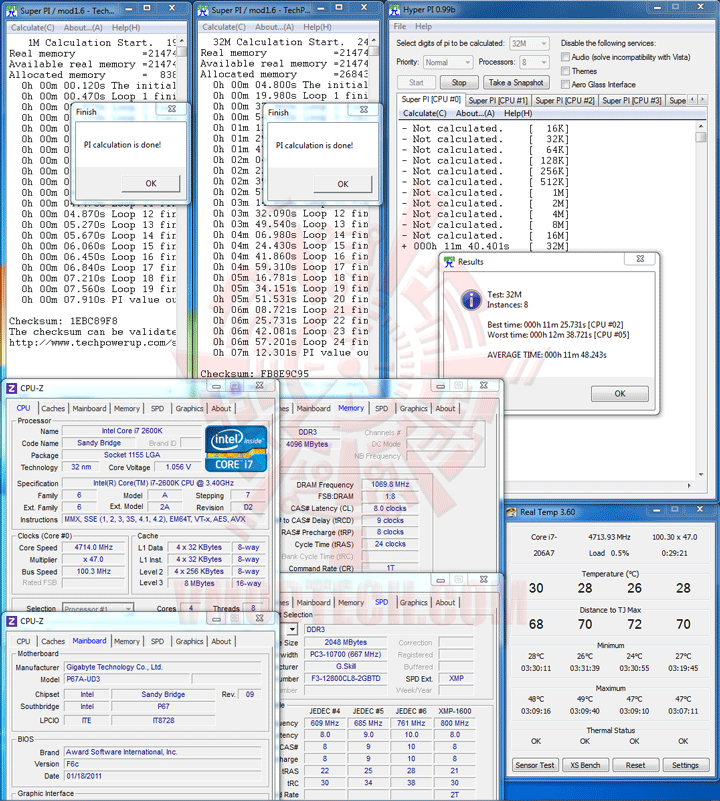
SuperPI 1M 1Thread, 32M 1Thread & 32M 8Threads
hpi 1 GIGABYTE P67A UD3 Motherboard Review

hpi 2 720x472 GIGABYTE P67A UD3 Motherboard Review

(Click ScreenShot to Enlarge)

ตามด้วยการทดสอบความเสถียรขั้นต่ำของเว็บไซต์เรา ด้วย SuperPI 32M 8Threads ซึ่งก็ผ่านกันแบบสบายๆนะครับที่ความเร็วระดับนี้ และเมื่อเสถียรกันเพียงพอแล้ว เราก็ไปลุยเทสต์ดูประสิทธิภาพกันต่อ ที่หน้าถัดๆไปกันเลยนะครับ

————————————————–

WinRAR3.91 ,wPrime2.00 ,CPUMark99 & Fritz Chess
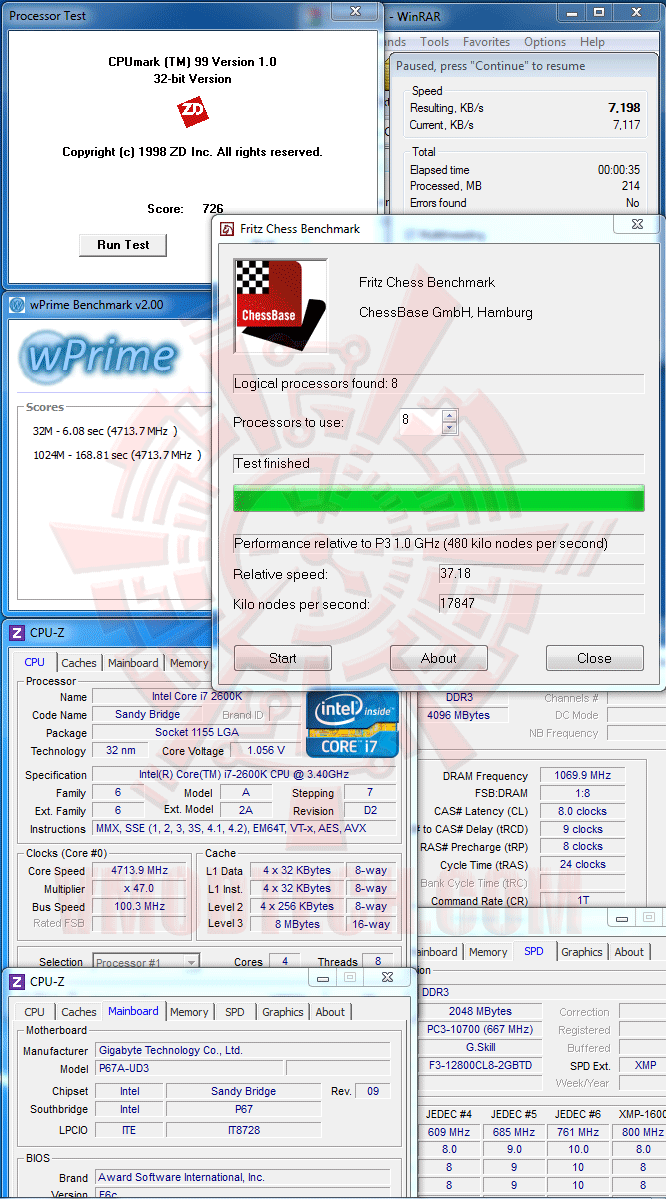
4714 v GIGABYTE P67A UD3 Motherboard Review

ผลเทสต์โดยรวมประสิทธิภาพที่ออกมาก็แรงดีครับ โดยเฉพาะ Winrar ที่แรงกันถึงระดับ 7,198KB/s

CINEBENCH R9.5
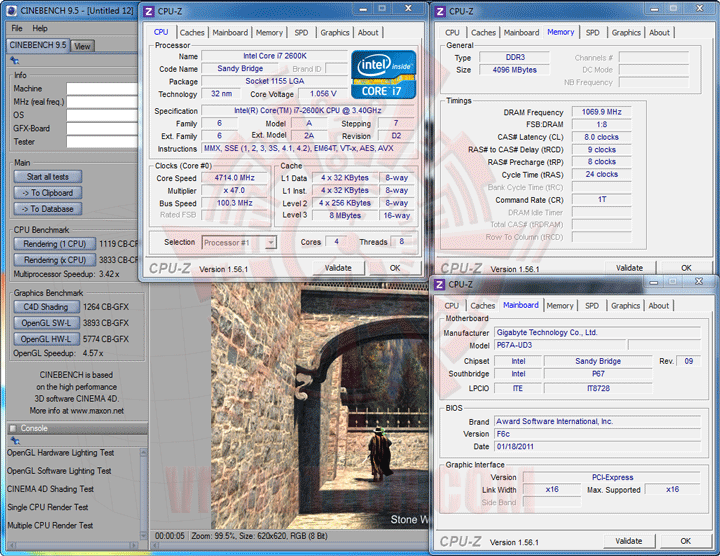
c95 GIGABYTE P67A UD3 Motherboard Review

CINEBENCH R10

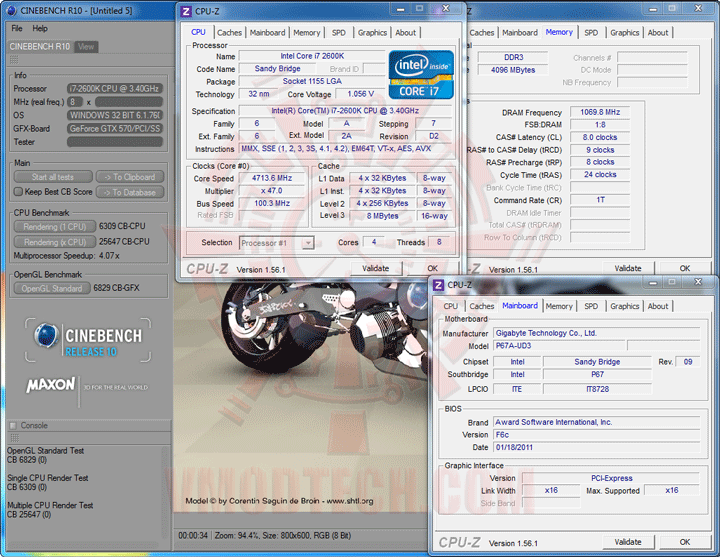
c10 GIGABYTE P67A UD3 Motherboard Review

CINEBENCH R11.5

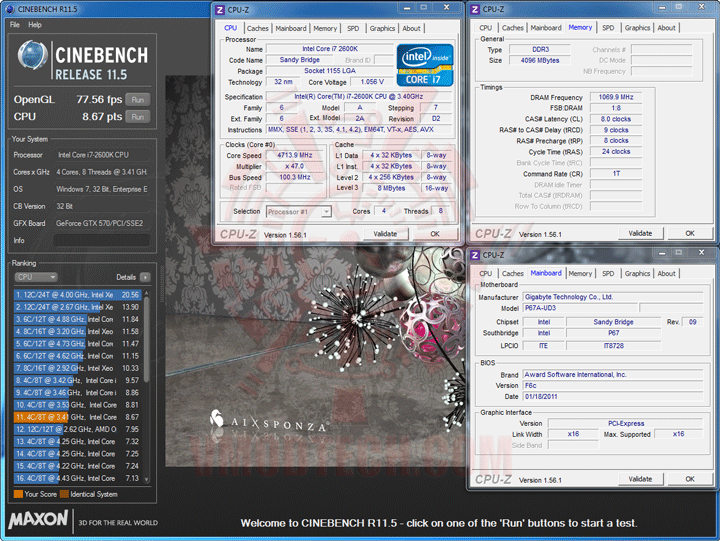
c115 GIGABYTE P67A UD3 Motherboard Review

แรงครับสำหรับ CineBench Series

PCMark 05
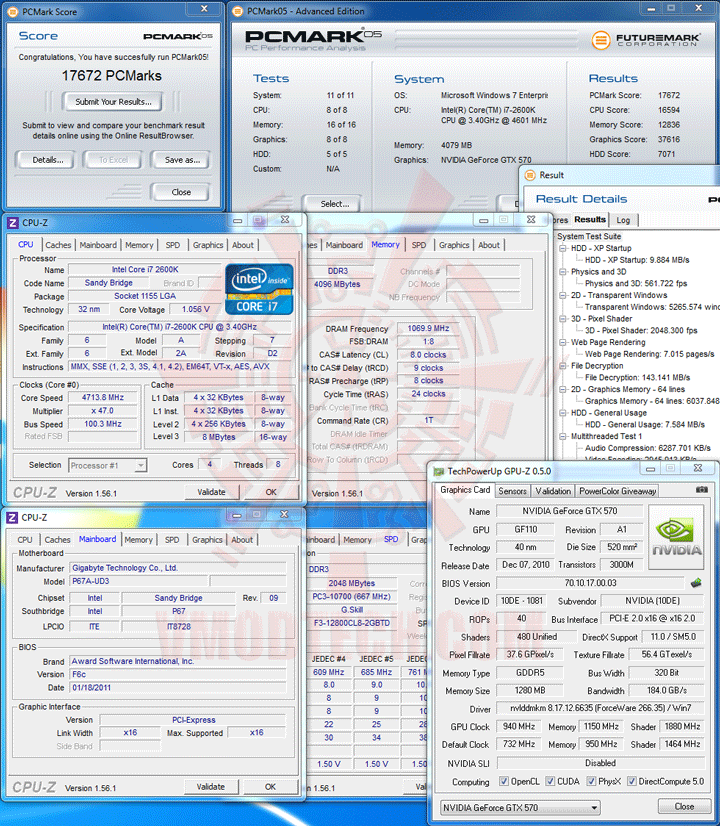
pcm05 GIGABYTE P67A UD3 Motherboard Review

คะแนน PCMark 05 ก็ออกมาแรงแบบหายห่วงที่ 17,672คะแนน ด้วยพลังจากฮาร์ดไดร์ฟจานหมุนธรรมดาเพียงเท่านั้น

————————————————–

AIDA64 Extreme Edition

e1 GIGABYTE P67A UD3 Motherboard Review

e2 GIGABYTE P67A UD3 Motherboard Review

e3 GIGABYTE P67A UD3 Motherboard Review

e4 GIGABYTE P67A UD3 Motherboard Review

e5 GIGABYTE P67A UD3 Motherboard Review

e6 GIGABYTE P67A UD3 Motherboard Review

e7 GIGABYTE P67A UD3 Motherboard Review

e8 GIGABYTE P67A UD3 Motherboard Review

e9 GIGABYTE P67A UD3 Motherboard Review

e10 GIGABYTE P67A UD3 Motherboard Review

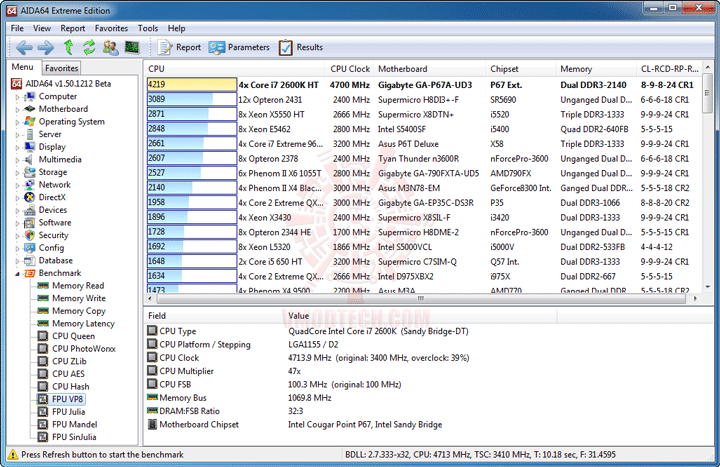
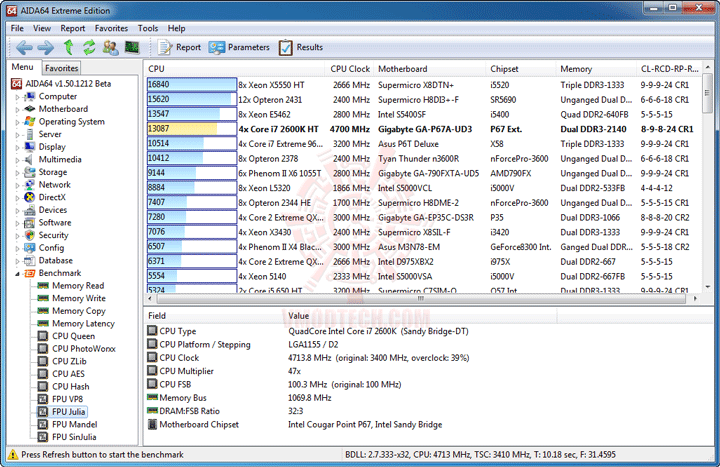
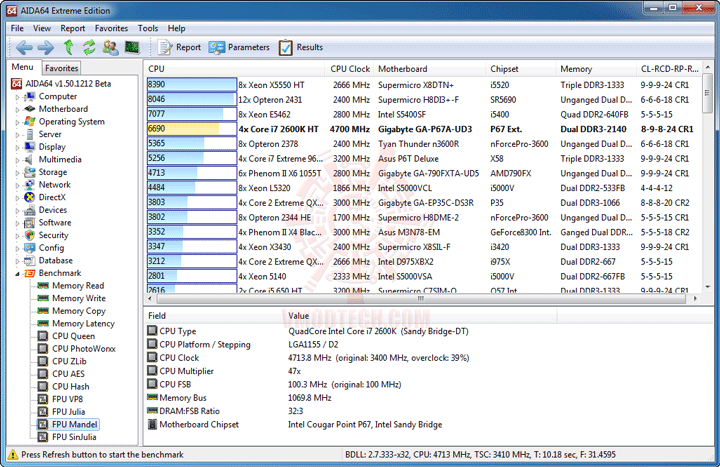
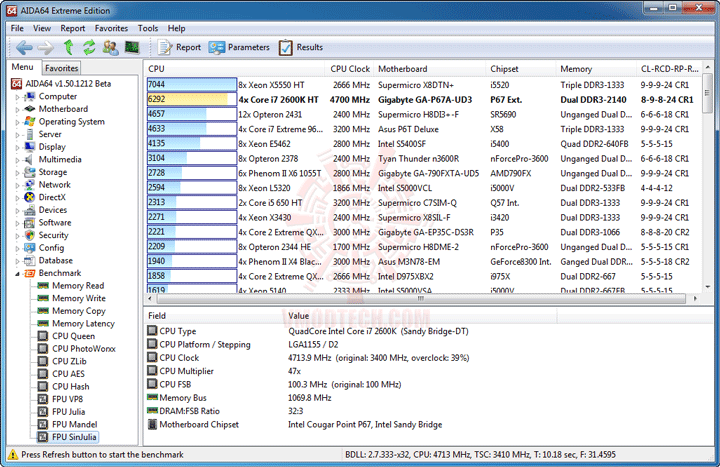
แรงทะลุกันไปเลยครับ โดยเฉพาะ Memory Bandwidth ที่่ Triple Channel DDR3 2000+ ยังต้องอายม้วน

————————————————–

Sisoft Sandra

s1 GIGABYTE P67A UD3 Motherboard Review

s2 GIGABYTE P67A UD3 Motherboard Review

s3 GIGABYTE P67A UD3 Motherboard Review

s4 GIGABYTE P67A UD3 Motherboard Review

s5 GIGABYTE P67A UD3 Motherboard Review

s6 GIGABYTE P67A UD3 Motherboard Review

แรงกันไปเช่นกันครับสำหรับ Sisoft

————————————————–

3DMark 03

03 GIGABYTE P67A UD3 Motherboard Review

คราวนี้ขอจัด GTX 570 มาให้ชมกันบ้างนะครับ แรงจริงๆเลยครับกับคะแนน 111,646 ของ 3DMark 03

3DMark 05

05 GIGABYTE P67A UD3 Motherboard Review

พอมา 3DMark 05 ก็แรงทะลุระดับ 42K กันไปครับ

3DMark 06

06 GIGABYTE P67A UD3 Motherboard Review

3DMark 06 ก็แรงครับ 33,240 คะแนนกันไป

3DMark Vantage PhysX Disable
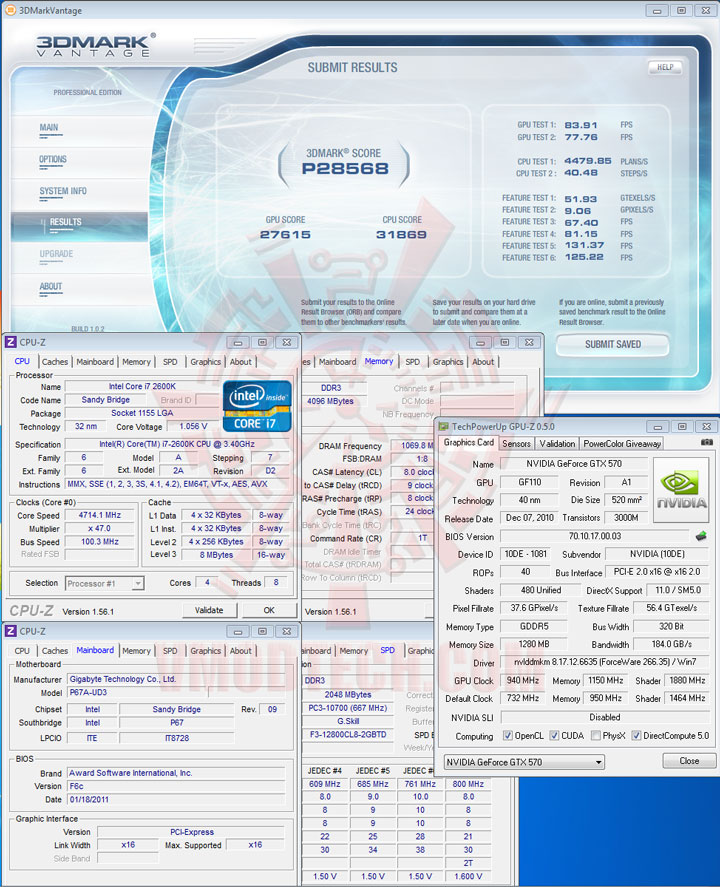
07np GIGABYTE P67A UD3 Motherboard Review

ส่วน 3DMark Vantage ปิด PhysX จัดไปครับ 28,568 คะแนน

3DMark Vantage PhysX Enable
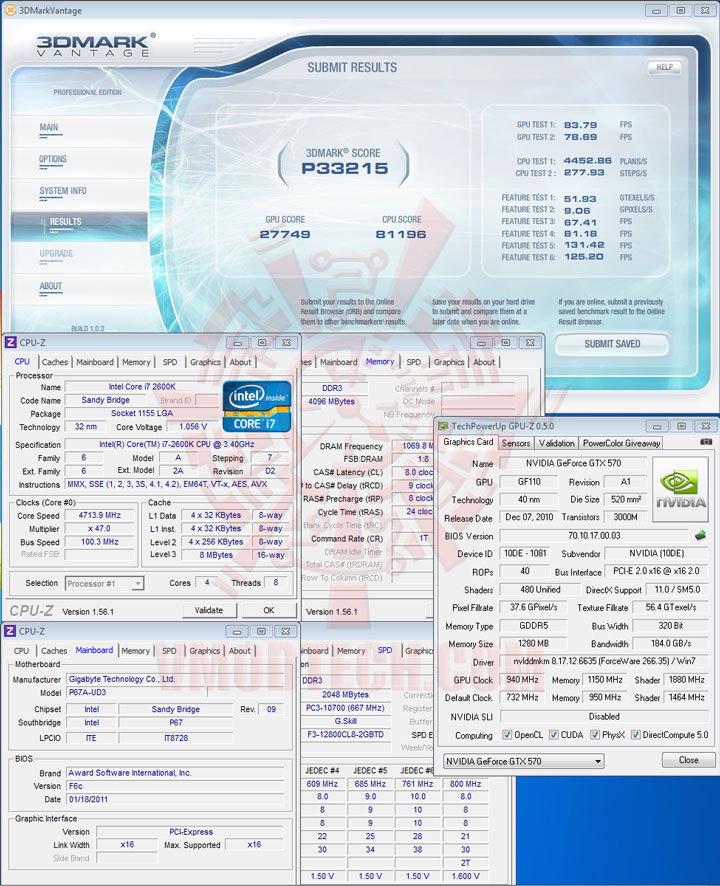
07p GIGABYTE P67A UD3 Motherboard Review

และพอเปิด PhysX ขึ้นมาเพียงเท่านั้น จัดไปครับที่ 33,215 คะแนน

3DMark 11

11 GIGABYTE P67A UD3 Motherboard Review

ปิดท้ายกันด้วย 3DMark 11 กับคะแนน 6,754คะแนน

————————————————–

Conclusion

dsc 0005 GIGABYTE P67A UD3 Motherboard Review

ก็เดินทางมาถึงบทสรุปกันแล้วนะครับ สำหรับมาเธอร์บอร์ด GIGABYTE P67A-UD3 ตัวนี้ อัดกับ Intel Core i7 2600K กันที่ความเร็ว 4,714MHz BClk 100.3MHz DDR3-2140 7-10-7-24-1T ไฟ VCore เดิมๆ ก็สามารถเทสต์ผ่านฉลุยทุกการทดสอบและทุกหัวข้อที่โหดๆ ครบถ้วนกันอย่างไม่หวั่น ซึ่งถ้าหากสามารถเพิ่มไฟ VCore ได้ ก็คงจะแรงกันกว่านี้อีกหลายกิโลขีดเป็นแน่ครับ ไม่แน่ใจเหมือนกันนะครับว่าอาการเพิ่มไฟไม่ได้แบบนี้ จะเป็นกับบอร์ดตัวที่ผมทดสอบตัวนี้ตัวเดียว หรือเป็นกับทุกตัวของรุ่นนี้กันแน่ ซึ่งถ้าเป็นกับบอร์ดทุกตัวก็ขอเอาใจช่วยให้แก้ไขปัญหานี้ได้ด้วย BIOS Version ใหม่ๆได้ในเร็ววันนี้ด้วยนะครับ และกับราคาขายที่ประมาณ 4,3XXบาท ก็ถือว่าเป็นอีกตัวเลือกหนึ่งที่น่าสนใจสำหรับคนที่มีงบประมาณสำหรับมาเธอร์บอร์ดที่ใช้ชิปเซต P67 ในขนาดนี้นะครับ และสำหรับวันนี้ผมก็ขอลาไปก่อนแต่เพียงเท่านี้ แล้วพบกันอีกทีในวันพรุ่งนี้ สวัสดีครับ

ของฝากทิ้งท้าย : สำหรับผู้ใช้มาเธอร์บอร์ด GIGABYTE ที่มีระบบ Dual BIOS แล้วต้องการแฟลชให้ BIOS ตัว Backup เป็นตัวล่าสุดเหมือนกับตัว Main เพื่อที่เวลา BIOS Recovery ตัวเองแล้ว จะได้ไม่ต้องแฟลชกลับให้เป็นตัวที่เราต้องการอีก มีวิธีการดังต่อไปนี้นะครับ

  • แฟลช BIOS ตัว Main ให้เป็น BIOS ตัวที่เราต้องการ จะใช้ Q-Flash ใน BIOS หรือโปรแกรม @BIOS ในวินโดว์ก็ได้ แล้วแต่ความสะดวกนะครับ แต่ถ้าต้องการแฟลช BIOS จากตัวเก่าที่แถมมากับบอร์ดที่ใช้ชิปเซต P67 ให้เป็น BIOS ใหม่ที่มีฟังก์ชัน Internal CPU PLL Overvoltage ต้องใช้โปรแกรม @BIOS แฟลช BIOS ในวินโดว์เท่านั้นนะครับ
  • หลังจากแฟลช BIOS เสร็จแล้วรีสตาร์ท พอเครื่องบูตขึ้นมาใหม่ ให้กดปุ่ม Alt+F12 ที่คีย์บอร์ดครับ
  • จะมีข้อความขึ้นมาว่ากำลังจะทำการแฟลช BIOS ตัว Backup ให้กด Enter หนึ่งทีก็เป็นอันเสร็จพิธี รอจนแฟลชเสร็จก็รีเซตเครื่องใช้งานได้เลยครับ

.

ขอขอบคุณ

SCANNER

«ก่อนหน้า 1 2 3 4 5 6 7 8 9 10 แสดงทั้งหมด ถัดไป»

ร่วมแสดงความคิดเห็นหรือวิจารณ์ Click!!!
Bookmark บทความ : Zickr Kudd Duocore Techkr aJigg Oncake Lefthit Meetgamer Siamcollective TagToKnow Dunweb Digza
«»